Python GUI Project: A Step-by-Step Guide to Make Your Own Drawing Canvas GUI
A Simple Paint app Project using Basic Python and Tkinter concepts.


✨Introduction
Hold onto your hats, folks! This tutorial is about to take you on a journey to create your own simple yet stunning Drawing GUI using Tkinter and Python basics. Think of it as a coloring book for coders. And just like a coloring book, you can always add your own personal touch by suggesting changes or new features and even submitting pull requests. So grab your virtual pencils and let's get started! Just a heads up, we'll be keeping it easy peasy for beginners, so don't expect any advanced features like saving as PNGs or JPEGs or working with images.
GitHub Repo : - Drawing Pad
👀 Overview
What can it do :
Create a rectangle, circle, or line with custom colors
Save the drawing in a pickle file.
Retrieve the drawing by opening the pickle file.
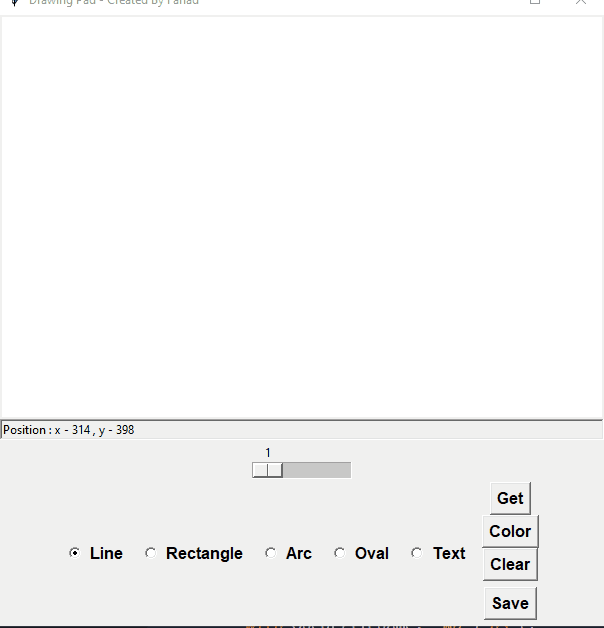
Take a look at the final project :
🖥 Step by step: Drawing Pad Project
📌Imports and Modules
In this project, we will use only Python built-in Tkinter library for GUI building and pickle for saving drawings in a .pkl file. No external module is used in this project.
from tkinter import *
import tkinter.messagebox as tmsg
from tkinter.filedialog import askopenfilename, asksaveasfilename #for saving files in a directory
import pickle #save draw object in pickle file
from tkinter.colorchooser import askcolor #custom color palates
📌Defining Variables
First, we need some global variables to use within functions. So, here are all variables need for this project. Look at the variables and why its created.
# Starting point of mouse dragging or shapes
prev_x = 0
prev_y = 0
# Current x,y position of mouse cursor or end position of dragging
x = 0
y = 0
created_element_info = [] #list of all shapes objects for saving drawing
new = [] # Each shapes of canvas
created = [] # Temporary list to hold info on every drag
shape = "Line" # Shape to draw
color = "blue" # Color of the shape
line_width = 3 # Width of the line shape
🎨 Create Window and Canvas
So before logic building for our project, let's build the GUI window with Tkinter. if you don't know how to use Tkinter then read the Tkinter guide for beginners.
Main Window:
# All the functions and logics go here
root = Tk()
root.title("Drawing Pad")
root.minsize(600,300) #Minimum Size of the window
# All Widgets here such as canvas, buttons etc
root.mainloop()
Canvas Widget:
Under main loop create the canvas
Specify Canvas width and height
Create a Canvas widget and pack it with root
CANVAS_WIDTH = 600
CANVAS_HEIGHT = 400
canvas = Canvas(root, width=CANVAS_WIDTH, height=CANVAS_HEIGHT, bg="white")
canvas.pack()
- Bind Some Functions with canvas. Note: These Functions are described in the logic section
# Binding Events to canvas
# Structure: canvas.bind("<eventcodename>", function-name)
canvas.bind("<1>", recordPosition) #On Mouse left click
canvas.bind("<B1-Motion>", drawShapesOnDragging) #Capture Mouse left click + move (dragging)
canvas.bind("<ButtonRelease-1>", generateShapesObj) #When Mouse left click release
canvas.bind("<Motion>", captureMotion) #Mouse Motion
📌Building Design and Widgets
We will create Buttons, Frames, and Status Bar for our Drawing GUI
- Frame: First Create a Bottom frame for the toolbar
frame = Frame(root)
frame.pack(side=BOTTOM)
- Radio Button: Now we will create radio buttons for selecting shapes and bind them with a frame. We will create radios from the shapes list and then manipulate them. Here the command is for running the function by its name. Don't worry we will create the function soon.
radiovalue = StringVar()
geometry_shapes = ["Line", "Rectangle", "Arc", "Oval"]
radiovalue.set("Line") #Default Select

# Manupulates Radios from the list
for shape in geometry_shapes:
    radio = Radiobutton(frame, text=shape, variable=radiovalue, font="comicsans     12 bold", value=shape, command=shapechanger).pack(side=LEFT, padx=6,pady=3)
- Button: Then create buttons for basic actions. These buttons command contains functions name that should be executed when the buttons click.
Button(frame, text="Save", font="comicsans 12 bold",
       command=saveDrawingFile).pack(side=BOTTOM, padx=6, pady=6)
Button(frame, text="Clear", font="comicsans 12 bold",
       command=clearCanvas).pack(side=BOTTOM, padx=6)
Button(frame, text="Color", font="comicsans 12 bold",
       command=colorPicker).pack(side=BOTTOM, padx=6)
Button(frame, text="Get", font="comicsans 12 bold",
       command=getsavedrawing).pack(side=BOTTOM, padx=6)
- Scale: Create a horizontal scale for controlling line thickness.
scale = Scale(root, from_=1, to=20, orient=HORIZONTAL, command=setlinewidth)
scale.pack(side=BOTTOM)
- Status Bar: Create a status bar to show x, and y positions of the mouse cursor
status = StringVar()
status.set("Position : x - 0 , y - 0")
statusbar = Label(root, textvariable=status, anchor="w", relief=SUNKEN)
statusbar.pack(side=BOTTOM, fill=X)
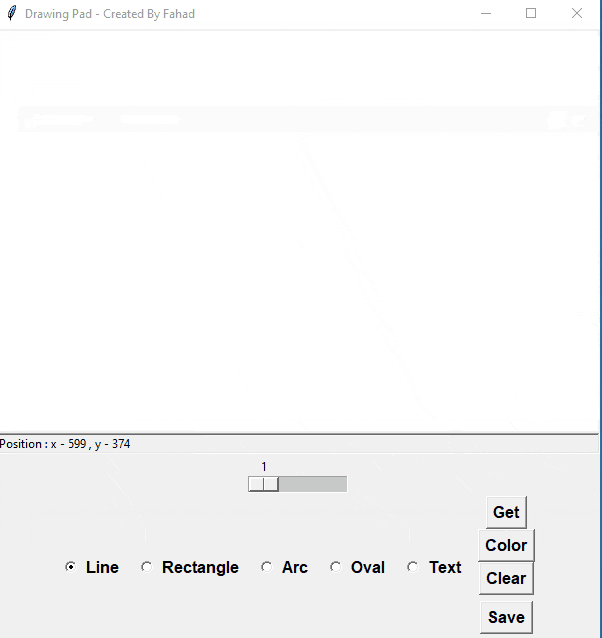
That's enough for our GUI. Now it looks like this
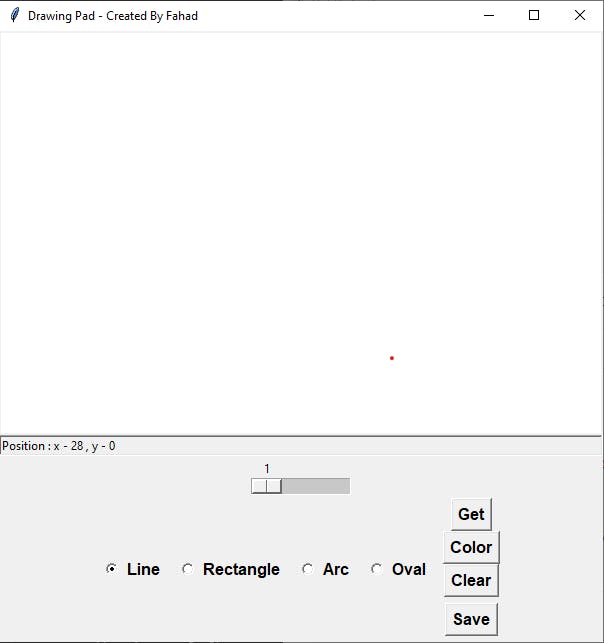
It is not working now. So let's create our app logic.
🧠App Logic
Our design is completed. Now we will create some functions to make it work! These functions should be placed outside the main loop.
Let's divide the app logic and problems to solve them easily
Divide Problems:
Create different shapes according to user radio selection
Draw the shapes and update the shape size dynamically by dragging
Delete all the shapes that will be created while dragging except the final shape
Create a list of dictionaries to store data of every shape containing the detail of shape position, color, etc.
Then save the list to a pickle file and finally retrieve the data from the file and draw them on the canvas.
📌Function to Update Values :
#Capture Motions on every mouse position change
def captureMotion(e=""):
    #Update Status Bar
    status.set(f"Position : x - {e.x} , y - {e.y}")
    statusbar.update()

# Update the previous position on mouse left click
def recordPosition(e=""):
    global prev_x
    global prev_y
    prev_x = e.x
    prev_y = e.y

# Color Picker for color button
def colorPicker(e=""):
    global color
    color = askcolor(color=color)[1]
    #Set the color of shapes
    root.config(cursor=f'cursor {color} {color}', insertbackground=f"{color}")

# Update the current shape
def shapechanger(e=""):
    global shape
    shape = radiovalue.get() #selected radio value

# Runs On scale value change and update line width
def setlinewidth(e=""):
    global line_width
    line_width = scale.get()
    # Save the drawing on a file

# After Every drawing create info of drawing and add the element to new list and assign empty list to created
def generateShapesObj(e=""):
    global created,created_element_info
    new.append(created[-1])
    created = []
    created_element_info_obj = {
        "type": shape,
        "color": color,
        "prev_x": prev_x,
        "prev_y": prev_y,
        "x": x,
        "y": y
    }
    created_element_info.append(created_element_info_obj)
The above functions are important for our generating shape logic
📌Draw Shapes on Canvas
This is the most important part of this project. First, we will create some functions to update global variables that are defined before.
1. Create shape functions
Note: This function uses the global variables to know what shape, color, and where to draw.
This createElms() the function will run by the drawShapesOnDragging() function on every mouse click with dragging.
# Create Elements on canvas based on shape variable
def createElms():
    if shape == "Rectangle":
        a = canvas.create_rectangle(prev_x, prev_y, x, y, fill=color)
    elif shape == "Oval":
        a = canvas.create_oval(prev_x, prev_y, x, y, fill=color)
    elif shape == "Arc":
        a = canvas.create_arc(prev_x, prev_y, x, y, fill=color)
    elif shape == "Line":
        a = canvas.create_line(prev_x, prev_y, x, y,
                               width=line_width, fill=color,
                               capstyle=ROUND, smooth=TRUE, splinesteps=3)
    return a
Explain: We want three shapes Rectangle, Oval, Arc, and Line for this project.
- First, we use the "shape" and "color" variables to create responding shapes to the canvas. I am not going to explain the canvas shape creation rather than I want to tell the logic behind it.
2. Generate shapes on mouse dragging
For generating shapes on mouse dragging, grab the x, and y positions on every mouse cursor position change. Then create shapes on every change, keep the new shape and delete other shapes.
Note: Here we want to keep starting point of the shape still on the drag start event and the end point means the x, and y positions will change dynamically on dragging.
# Create shapes on mouse dragging and resize and show the shapes on the canvas
def drawShapesOnDragging(e=""):
    global x,y
    try:
        # Update current Position
        x = e.x
        y = e.y

        #Generate Element
        element = createElms()
            deleteUnwanted(element) # Delete unwanted shapes
    except Exception as e:
        tmsg.showerror("Some Error Occurred!", e)
Problem: Without ```deleteUnwanted()``it will work like this. But We don't want these unwanted shapes on x,y position changes of the mouse cursor. This will create a lot of shapes on every position change of the mouse cursor. So we need to keep one element at the end. So we will delete other shapes from the canvas and keep the new one
**Solution: ** So add the function to solve this problem.
def deleteUnwanted(element):
    global created
    created.append(element) #Elements that created
    for item in created[:-1]:
        canvas.delete(item)

Now it is dynamic and changes its endpoint on dragging but not the starting point.
📌Clear Canvas
We make a button before for clearing the canvas but we don't write the function for the button clearCanvas()
# Clear the canvas
def clearCanvas(e=""):
    global created_element_info, canvas, created, new
    canvas.delete("all")
    created_element_info = []
    created = []
    new = []
📌Saving Drawing in Pickle file
To save the drawing, we need to save the generated object list of shapes info and write it on the pickle file. It creates a list of drawing information dictionaries such as below (given the structure of the data):
# This is not for the GUI. It's just a structure of the generated data.
created_element_info = [
    {
        "type": shape, #Shape of drawing like line, circle, rectangle
        "color": color, #Color of the shape
        "prev_x": prev_x, #Starting point from the x axis
        "prev_y": prev_y, #Starting point from the y axis
        "x": x, #End point of the x axis
        "y": y #End point of the y axis
    },
    {
        ......
        ......
    },
    # .....................
]
Save the list to a pickle file:
# Save the list of shapes objects on a pickle file
def saveDrawingFile(e=""):
    global created_element_info
    filename = asksaveasfilename(initialfile="drawing",defaultextension=".pkl",filetypes=[("Pickle Files", "*.pkl")]) #Save as
    if filename != None:
        with open(filename, "wb") as f:
            pickle.dump(created_element_info, f)
📌Retrieve Drawing from File
Retrieve the data from the pickle file and then draw the shapes from the info
def getsavedrawing():
    global x, y, prev_x, prev_y, shape, color
    filename = askopenfilename(defaultextension=".pkl", filetypes = [("Pickle Files", "*.pkl")])
    if filename != None:
        with open(filename, "rb") as f:
            data = pickle.load(f)
            for draw_info in data:
                x = draw_info["x"]
                y = draw_info["y"]
                prev_x = draw_info["prev_x"]
                prev_y = draw_info["prev_y"]
                shape = draw_info["type"]
                color = draw_info["color"]
                createElms() #Draw each shapes
That's the end. Now our app is complete!
Now Here is the final code.
👩💻 Final Code
GitHub Repo : - github.com/RF-Fahad-Islam/Drawing-Pad
from tkinter import *
import tkinter.messagebox as tmsg
from tkinter.filedialog import askopenfilename, asksaveasfilename #for saving files in a directory
import pickle #save draw object in pickle file
from tkinter.colorchooser import askcolor #custom color palates

# Starting point of mouse dragging or shapes
prev_x = 0
prev_y = 0
# Current x,y position of mouse cursor or end position of dragging
x = 0
y = 0
created_element_info = [] #list of all shapes objects for saving drawing
new = [] # Each shapes of canvas
created = [] # Temporary list to hold info on every drag
shape = "Line" # Shape to draw
color = "blue" # Color of the shape
line_width = 3 # Width of the line shape

# All the functions and logics go here
#Capture Motions on every mouse position change
def captureMotion(e=""):
    #Update Status Bar
    status.set(f"Position : x - {e.x} , y - {e.y}")
    statusbar.update()


# Update the previous position on mouse left click
def recordPosition(e=""):
    global prev_x
    global prev_y
    prev_x = e.x
    prev_y = e.y

# Color Picker
def colorPicker(e=""):
    global color
    color = askcolor(color=color)[1]
    #Set the color of shapes
    root.config(cursor=f'cursor {color} {color}', insertbackground=f"{color}")

# Update the current shape
def shapechanger(e=""):
    global shape
    shape = radiovalue.get() #selected radio value

# Runs On scale value change and update line width
def setlinewidth(e=""):
    global line_width
    line_width = scale.get()
    # Save the drawing on a file

# After Every drawing create info of drawing and add the element to new list and assign empty list to created
def generateShapesObj(e=""):
    global created,created_element_info
    new.append(created[-1])
    created = []
    created_element_info_obj = {
        "type": shape,
        "color": color,
        "prev_x": prev_x,
        "prev_y": prev_y,
        "x": x,
        "y": y
    }
    created_element_info.append(created_element_info_obj)

# Create Elements on canvas based on shape variable
def createElms():
    if shape == "Rectangle":
        a = canvas.create_rectangle(prev_x, prev_y, x, y, fill=color)
    elif shape == "Oval":
        a = canvas.create_oval(prev_x, prev_y, x, y, fill=color)
    elif shape == "Arc":
        a = canvas.create_arc(prev_x, prev_y, x, y, fill=color)
    elif shape == "Line":
        a = canvas.create_line(prev_x, prev_y, x, y,
                               width=line_width, fill=color,
                               capstyle=ROUND, smooth=TRUE, splinesteps=3)
    return a

# Create shapes on mouse dragging and resize and show the shapes on the canvas
def drawShapesOnDragging(e=""):
    global x,y
    try:
        # Update current Position
        x = e.x
        y = e.y

        #Generate Element
        element = createElms()
        deleteUnwanted(element) # Delete unwanted shapes
    except Exception as e:
        tmsg.showerror("Some Error Occurred!", e)

def deleteUnwanted(element):
    global created
    created.append(element) #Elements that created
    for item in created[:-1]:
        canvas.delete(item)

# Save the list of shapes objects on a pickle file
def saveDrawingFile(e=""):
    global created_element_info
    filename = asksaveasfilename(initialfile="drawing",defaultextension=".pkl",filetypes=[("Pickle Files", "*.pkl")]) #Save as
    if filename != None:
        with open(filename, "wb") as f:
            pickle.dump(created_element_info, f)

def getsavedrawing():
    global x, y, prev_x, prev_y, shape, color
    filename = askopenfilename(defaultextension=".pkl", filetypes = [("Pickle Files", "*.pkl")])
    if filename != None:
        with open(filename, "rb") as f:
            data = pickle.load(f)
            for draw_info in data:
                x = draw_info["x"]
                y = draw_info["y"]
                prev_x = draw_info["prev_x"]
                prev_y = draw_info["prev_y"]
                shape = draw_info["type"]
                color = draw_info["color"]
                createElms() #Draw each shapes

# Clear the Canvas
def clearCanvas(e=""):
    global created_element_info, canvas, created, new
    canvas.delete("all")
    created_element_info = []
    created = []
    new = []

root = Tk()
root.title("Drawing Pad")
root.minsize(600,300) #Minimum Size of the window
# All Widgets here such as canvas, buttons etc

# Canvas
CANVAS_WIDTH = 600
CANVAS_HEIGHT = 400
canvas = Canvas(root, width=CANVAS_WIDTH, height=CANVAS_HEIGHT, bg="white")
canvas.pack()

# Binding Events to canvas
# Structure: canvas.bind("<eventcodename>", function-name)
canvas.bind("<1>", recordPosition) #On Mouse left click
canvas.bind("<B1-Motion>", drawShapesOnDragging) #Capture Mouse left click + move (dragging)
canvas.bind("<ButtonRelease-1>", generateShapesObj) #When Mouse left click release
canvas.bind("<Motion>", captureMotion) #Mouse Motion
frame = Frame(root)
frame.pack(side=BOTTOM)
radiovalue = StringVar()
geometry_shapes = ["Line", "Rectangle", "Arc", "Oval"]
radiovalue.set("Line") #Default Select

# Manupulates Radios from the list
for shape in geometry_shapes:
    radio = Radiobutton(frame, text=shape, variable=radiovalue, font="comicsans     12 bold", value=shape, command=shapechanger).pack(side=LEFT, padx=6,pady=3)

#Buttons
Button(frame, text="Save", font="comicsans 12 bold",
       command=saveDrawingFile).pack(side=BOTTOM, padx=6, pady=6)
Button(frame, text="Clear", font="comicsans 12 bold",
       command=clearCanvas).pack(side=BOTTOM, padx=6)
Button(frame, text="Color", font="comicsans 12 bold",
       command=colorPicker).pack(side=BOTTOM, padx=6)
Button(frame, text="Get", font="comicsans 12 bold",
       command=getsavedrawing).pack(side=BOTTOM, padx=6)

# Scale
scale = Scale(root, from_=1, to=20, orient=HORIZONTAL, command=setlinewidth)
scale.pack(side=BOTTOM)

# Status Bar
status = StringVar()
status.set("Position : x - 0 , y - 0")
statusbar = Label(root, textvariable=status, anchor="w", relief=SUNKEN)
statusbar.pack(side=BOTTOM, fill=X)
root.mainloop()
📃Conclusion
And just like that, our project is wrapped up tighter than a burrito! If you come across any pesky bugs, feel free to squash them and send them over to our GitHub. And if you found this blog post helpful, let us know by leaving a comment and submitting your improvements via pull request. We welcome any and all changes to this project. Until next time, happy coding!"
GitHub Profile: RF Fahad Islam